Monday, 24 November 2014

How to Track or Locate Your Lost Phone with Android Device Manager

How to Track or Locate Your Lost Phone with Android Device Manager

       Losing your smart phone can be a big problem. Phone these days is not only a mobile device that can be used for various tasks, but it is also used to store various types of information, such as contacts, messages, credit card numbers, passwords, and other valuable infos, and therefore, losing such an important device can be a real big problem.

       If you’ve lost your Android phone, don’t panic because Google has released a new service called Android Device Manager which will help you to locate your phone even if you haven’t installed a tracking app before it was lost.
       The best thing about it is that you don’t need to install an app to be able to track your devices. The only requirement is that your lost device is connected to your Google account, GPS services enabled and connected to the internet.

How to locate your lost phone using Android Device Manager:

      First, visit www.google.com/android/devicemanager on your computer web browser and log in with your Google account. You may get a prompt asking you for permission to allow Android Device Manager to use location data. Click on the “Accept” button to continue.

       Then a map will pop up with some information about your device. If you already have a device with GPS/location services turned ON then it should automatically appear on the map otherwise it will report that the location is unavailable. So it is a good time to head into your device’s location settings and make sure your GPS services are enabled. GPS doesn’t drain your battery unless it’s actively being used, so it wouldn’t hurt to leave it on for good.

       In addition to tracking your phone location, the Android Device Manager also allows you to ring a lost phone, remotely lock the device, and erase all your data.
 
       Select the ‘Ring’ option, and your device rings at maximum volume, even if it’s set to vibrate or silent. This is particularly helpful if you’ve lost it somewhere in the house.

       Clicking on ‘Lock’ option will bring up a dialogue box that lets you remotely create a new password for the lock screen while the ‘Erase’ allow you to wipe all data from your device and return it to factory settings.

      If you are sure that you can’t get your phone back and you have sensitive information on it, then the Erase option function will come in handy. After you click Erase, a pop up will prompt you to confirm the action and tell you that the procedure will erase all of the data from your device and reset it. If you confirm the erase, the device erases itself and reboots. Once your device has been wiped, you will no longer be able to access it from Android Device Manager. Also keep in mind that a remote factory reset may not wipe external SD memory cards.

       To be able to use the Lock and Erase functions, you’ll need to enable Android Device Manager on your Android device. (If your device is already missing, then it is too late). To activate it, go to the Settings -> Security -> Device Administrators. From there, check the checkbox next to Android Device Manager. You’ll be prompted with the following screen. Tap Activate, and you’re all set.

       Android Device Manager won’t work for devices that are powered off, but actions you initiate while the device is turned off will be performed as soon as the device is back online.

SwiftKey board gets updated with better performance, more languages39 

SwiftKey gets updated with better performance, more languages39 

        SwiftKey, the popular predictive keyboard, with more attractive  themes,  has just received a significant update that includes performance boosts as well as additional languages. Performance has always been a pain point of SwiftKey, with many reporting lag when typing and particularly when opening and closing the keyboard. This latest update includes faster response time when typing as well as reduced time for the opening and closing of the keyboard.In addition to these performance enhancements, SwiftKey now supports 12 more languages including Bengali, Nepali, Punjabi and more. All in all, this is a great update for SwiftKey that not only opens it up to more folks, but also improves it for those already using it. Check out the Play Store to see if you’ve received the update yet. If you don’t have SwiftKey, try it out for yourself!

Sunday, 23 November 2014

Review: Atongm Bluetooth Laser Keyboard

Review: Atongm Bluetooth Laser Keyboard

       When it comes to typing on phones, things have changed remarkably over the past few years. Physical keyboards used to be the name of the game, dominating the phone market. Nearly every phone, smart or otherwise, came with some sort of physical keyboard to aid in typing. Then the wave of touchscreen phones arrived, and with it came the death of the physical keyboard. Now we’ve reached the point that it’s an extreme rarity to see a physical keyboard on a smartphone. But there’s a new type of keyboard that could supplement people’s smartphones and tablets to aid in typing longer documents. That keyboard is the Atongm Bluetooth Laser Keyboard.

       While it may sound like something out of sci-fi movie, the Atongm Bluetooth Laser Keyboard is actually a simple concept. A laser projects a keyboard onto a flat surface, and then a sensor picks up when your fingers (or any other object) tap against the projected keys. Other than that, there’s not much to it. The keyboard connects to tablets, phones and PCs over Bluetooth, making it compatible with nearly everything.

       Connecting a device to the Atongm Bluetooth Laser Keyboard can be a bit confusing at first. The laser keyboard will be up and running, but if you scan for it with your device, you probably won’t find it. The laser keyboard doesn’t usually have Bluetooth turned on by default, which is confounding until you realize it. It can appear to be working correctly but your device won’t detect it. To turn Bluetooth on the keyboard on, simply hold down FN + B and the device will let out a long beep and a slowly flashing blue light will appear on the bottom left of the device, indicating that it’s ready to connect.

       Once connected, you can type with the keyboard just like you would type with a virtual keyboard. Tapping onto a hard surface and having letters appear takes a bit of getting used to, and you’ll probably make more than a few mistakes as you’re acclimating to the process. Once you’ve adjusted, you’ll find that you can type moderately swiftly on the laser keyboard and it’ll pick up your keystrokes.

       Unfortunately, the very nature of the device hinders it from being too useful to very fast typists. The sensor simply can’t pick up all of the keystrokes if you type very quickly, so expect it to be slower than typing on a physical keyboard. The size and layout, however, help to make up for that, as it follows a fairly standard layout for a keyboard of that size. That means that you have a full QWERTY layout with special keys around. For typing anything longer, it makes it much more comfortable, especially on your hands and wrists.

      On each keypress, the device is set to beep. While useful when learning to use the keyboard, it quickly grows to become a nuisance. Fortunately a simple key code of FN + P will turn off the sound with a long beep, but I wish the device had a memory for whether the sound was on or off. Whenever the device is turned off and then turned back on, the sound is automatically on, making it a bit noisy to use in class before you have a chance to turn off the sound.

Motorola Droid Turbo technical review

Motorola Droid Turbo technical review

       Motorola’s having a bit of an identity crisis these days. The company’s main focus is on the second generation Moto X, one of the most refined smartphones of 2014. It features a decent spec sheet and an exquisite design at a price that can’t be beat. But the Moto X isn’t Motorola’s best smartphone. Six weeks after the Moto X went on sale, Motorola and Verizon unveiled the new Motorola Droid Turbo, a device that puts the Moto X to shame.

Specs

      If you’re looking for all the latest and greatest specs, the Motorola Droid Turbo has them! Motorola has equipped the Droid Turbo with a Snapdragon 805 SoC paired with 3GB of RAM used to power up the phone’s 5.2-inch 1440×2560 QHD AMOLED display with a pixel density of 565ppi. The front-facing camera sports a standard 2-megapixel imaging sensor, but Motorola has gone all out by equipping the main camera with massive 21-megapixel sensor that’s paired with an f/2.0 lens. To keep the Droid Turbo up and running, a 3,900mAh battery has been thrown in.

      The Motorola Droid Turbo comes with the usual array for sensors (accelerometer, ambient light, eCompass, gyroscope, hall effect, infrared, proximity), NFC support, mono speaker, Bluetooth 4.0 LE and dual-band 802.11 a/b/g/n/ac WiFi. Motorola could have added another front-facing speaker or bumped up the resolution of the front-facing camera, but they pretty much checked every box to make sure the Droid Turbo lives up to its name.

Performance

Spec junkies will love everything about the Motorola Droid Turbo, but the list of amazing internal components don’t really add up to much in day-to-day use. The Droid Turbo is fast and smooth and can handle anything you can throw at it. In our two weeks of using the phone, we only saw the phone stutter a few times, but that was only when we were installing multiple apps while hacking up a few waves of monsters in Legions of Heroes or trying to switch apps after watching full-screen video in Chrome.

      The problem is, the performance experience offered by the Motorola Droid Turbo is on par with flagship devices from early 2014 that have inferior processors and less RAM. The chart below give a clear picture of how the performance of the Droid Turbo stacks up against other devices, but it also reveals why the phone doesn’t blow away the competition. The culprit is the Droid Turbo’s fabulous 5.2-inch 1440×2560 QHD display. If you take a close look at the GFXBench numbers below, you’ll notice that the Droid Turbo’s off-screen numbers are significantly higher than the standard numbers for the same benchmark test, clearly showing that the Droid Turbo has an incredible amount of processing power that’s being wasted because it needs to work harder to process everything for the phone’s higher resolution display.

      Could the Motorola Droid Turbo be a little faster with a 1080p display? Certainly, but we honestly don’t know what you’d use that extra processing power for.

Battery

The 3,900mAh battery fitted inside the Motorola Droid Turbo is quite a bit larger than what we’ve seen from most phones this year. But don’t let that number fool you; Motorola is promising “up to 48 hours of battery life” on a single charge, but the only way you’ll ever see that number is if you don’t use the phone. Our battery tests show that the Droid Turbo can easily make it through a single day with roughly five and a half hours of screen-on time. You can leave the phone unplugged over night after a full day of use and have enough power to check a few emails in the morning, but that’s about it.

       Fortunately, the Droid Turbo comes with Motorola’s new Turbo Charger that promises to supply enough power for eight hours of use in just 15 minutes of charging. The numbers are a little off, but the Motorola Turbo Charger is a lifesaver if your battery is running low and you only have a few minute to charge it before leaving your home of office. We found that we could get a 35 percent battery charge in about 15 minutes, but the charging  speed slows down significantly after you hit a 50 percent charge.

       During our three weeks with the Droid Turbo, we found that the poor battery performance is directly linked to the 5.2-inch QHD display. You can practically hear the battery being depleted every time the phone’s display is illuminated. To back up our theory, we charged the Droid Turbo up and set it aside for three full days. The next time we checked the phone there were a few hundred Gmail, Twitter, Instagram and Facebook notifications, but the phone’s battery lever was still sitting above 60 percent.

Display

       So far, you may have the impression that the display on the Motorola Droid Turbo is the worst part about the phone. It’s the main cause of the device’s average battery life and the extra pixels are what’s holding the phone back from being one of the best performing smartphones on the market. That being said, the 3,686,400 pixels that are crammed into the 5.2-inch AMOLED display are a sight to be seen. The difference between a QHD and a FHD display is subtle at best, but you can see the difference if you look hard enough.

       Motorola could tone the saturation level down a bit, but we found that the AMOLED display to have incredible viewing angles and with the brightness setting set to max, it even offered a decent viewing experience in direct sunlight.

Camera

The camera on the Motorola Droid Turbo is leaps and bounds better than anything we’ve seen from Motorola in the past. The camera on the second gen Moto X is better than the original, but the Droid Turbo’s is even better. With a 16:9 aspect ratio, the camera captures 15.5-megapixel images, but if you opt for the traditional 4:3 aspect ratio you’re treated to a full 21 megapixels. Pictures are crisp and color accuracy is quite impressive, but we did notice quite a bit of noise in our shots when taking picture in low light. Thankfully, the dual-LED two-tone flash helps a little in these situations, as long as your subject if within five feet.

If you’re a fan of 4K video, you’ll be happy to know that the Motorola Droid Turbo can record in UHD at 30 frames per second. While most people still can’t enjoy 4k video, keeping the video resolution at its highest setting means you can actively use digital zoom with a final output that’s still higher than 1080p.

       Motorola’s camera app hasn’t been tweaked much since it was introduced on the Moto X last year. The interface allows you to tap the display to capture a picture or drag your finger to the focus on your subject. While the app tries to keep things simple, swiping the menu in from the side is more cumbersome than it needs to be. And since launching the camera requires a hardware button push, unlock screen swipe and a tap on the camera app icon, the Turbo comes with Motorola’s Quick Capture feature that launches the camera app with a double twist of the phone, even when the display is off.

Software

      The software on the Motorola Droid Turbo is superb. Motorola has taken everything that it’s been refining on the Moto X and slapped it on the Droid Turbo. At its core, the Motorola Droid Turbo is running a near-stock version of Android 4.4.4. There are custom tweaks within certain applications, but we’d forgive you if you happened to mistake the phone for a Google Play edition or Nexus device.

       The few tweaks that Motorola has incorporated do enhance the user experience. Active notifications light up on the display when the phone senses you are near, displaying the time, missed calls, text messages or other notifications on a black screen. Motorola has also ported over Touchless Control, allowing voice interaction with the device even when the display is off. Just set your own launch phrase like “Hello Turbo” and you’re all set. Two of my favorite Touchless Control commands are “When is my next meeting?” and “What’s up?” The first will dictate the next meeting set in your calendar and the second will read through your notifications and give you the weather. You’ll still get weird stares when you talk to your phone in public, but it’s a magical experience when you can send or reply to a text message while you’re chopping up veggies for dinner.

Conclusion

       On paper, the Droid Turbo is one of the best Android devices of 2014. The phone is equipped with amazing components, but the overall experience delivered by the phone falls short. If you’re a fan of Verizon’s Droid lineup and have owned a Droid before, we recommend giving the Turbo a try.

Saturday, 22 November 2014

Android application to check Facebook profile visitors

Who viewed my profile is an Android app that let’s you check your Facebook profile visitors


Link:- https://play.google.com/store/apps/details?id=com.bilal.whoviwedmyprofile
      This app has a free and paid version
       The free version doesn’t shows the comprehensive list ,where as the paid one shows the complete list.
You can the the free app
       Just download from the link and login with your Facebook account,
And get the list.

Some tips to Boost up Internet speed on your Phone

Some tips to Boost up Internet speed on your Phone

      To almost all the internet users speed and connectivity is one of the most crucial factor,Speed is really important because  it determines the productivity as well as saves your time,if you are a regular internet user you can practice these ways to enhance your internet speed on android phones.

For non rooted users:-

      Change your DNS:-Get a DNS Changer app for your mobile and change your default DNS to the google DNS,if you want to do it without any additional app just change the dns from the advanced option in wifi,but all android phones may not support this without an app so its better to use an app,Doing this can give a 6-7% boost to your speed

For rooted phone users:-

      Disable the app(s) access to internet:-You can use apps such as ‘avast’ or ‘Droid wall’ to block the internet access for other apps installed on your phone using your internet data in background and utilize that speed for browsing.

Other tips:-

       Never download the apps that claim to increase your speed because speed depends on your ISP and not the apps
      To get more speed on PC combine multiple networks using a paid software ‘connectify’ and increase your speed.

Recharge your Mobile for 100 Or above and get flat 25RS off at ngpay

Recharge your Mobile for 100 Or above and get flat 25RS off at ngpay

       Ngpay is the only mall which travels with you,where ever you go,The stores is opened from day to night for you to shop anytime. You can easily book travel,movie tickets, shop for your favorite brands, send gifts and recharge your mobile & DTH set.Ngpay app lets us easily and instantly recharge Mobiles or Book train tickets using our IRCTC account,the app also gives you points for referring friends which will get you discount for your recharges.

25Rs discount offer :-

       To get 25 Rs discount on your recharge just goto the app(http://www.ngpay.com/site/) and signup or login to your account,then initiate a recharge for 100 rs or more and apply the coupon FLAT25 ,to get 25 rs off on your recharge.

       Coupon will be valid till 30th nov,you can also refer your friends to get them discount on recharges and earn points ,which will get you additional discount

Update Google Maps version 9.0.0 APK (Material Design)

Update Google Maps version 9.0.0 APK (Material Design)

      The next app to be treated to material design is Google Maps, and boy does it look good. Hitting version 9.0.0, this Google Maps update focuses entirely on bringing Material Design to the app, as well as OpenTable integration in the all countries .

Why Download?

      If you’re the type of person who likes to stay on the cutting edge of software then you’ll want to get your hands on the file. And, given software updates is now available on play store

Friday, 21 November 2014

Reading smart phones or tablets at night time causes eye strain and heart diseases

Reading  smart phones or tablets  at night time  causes eye strain and  heart diseases

       Reading your smartphone or tablet in the dark is probably bad for you. That’s unlikely to stop you, so beyond quitting cold turkey, what are the easiest ways to fix your bedtime reading device so it doesn’t put so much strain on your eyes?

       There’s a growing body of research that suggests “peering at brightly lit screens at night disrupts the body’s natural rhythms and raises the risk of medical conditions linked to poor sleep, including obesity, heart disease, strokes and depression.”

       While it’s no secret that artificial light takes a tolls on our circadian rhythms, recent publications suggest that LCDs might be even worse on your sleep patterns. Phone and tablet screens display light in a predominantly blue hue, and it’s now thought that the blue light emitted by these screens actually tricks our brain into waking up, when it really needs to fall asleep.

       Knowing all this, are you now less likely to take your smartphone, tablet, or laptop to bed with you? We’re guessing no. What you can do instead is adjust your screen brightness and don't  play  games at bedtime so it doesn’t have as negative an impact on your eyes.

How to disable automatic update of apps in android

How to disable automatic update of apps in android

       By default, Android apps downloaded from the Google Play Store are automatically updated. If you would rather review the updates and any new or changed permissions associated with the updates, you can choose to disable automatic updates.

       The options for automatic updates are slightly different in the new version (5.0) of the Play Store. We will show you how to do it in both the old and the new versions.

Google Play Store Prior to Version 5.0

      To turn off automatic updates in versions of the Play Store earlier than 5.0, touch the Play Store icon on your Home screen.

   1.   In the Play Store, touch the menu button in the upper-left corner of the screen.

   2.   Touch “Settings” on the menu.

   3.   The “Auto-update apps” option is in the “General” section of the “Settings” screen. If it says “Auto-update apps at any time. Data charges may apply,” then your apps will be automatically updated. To turn this option off, touch “Auto-update apps.”

   4.   On the “Auto-update apps” dialog box, touch “Do not auto-update apps.”

   5.   The dialog box closes and the “Auto-update apps” option is updated with the “Do not auto-update apps” setting. Touch the Play Store icon in the upper-left corner of the screen to go back to the main Play Store screen. You can also touch the Back button on your device.

    6.   On a Google Nexus 7, when you hold the device in landscape mode, and you’re on the “My apps” screen, the screen is split into two panes. The left pane contains your list of “Installed” apps and “All apps”. The left pane contains buttons allowing you to “Open,” “Update,” or “Uninstall” the app. The “Allow automatic updating” check box is also available in the right pane.

    7.  If you select the “Allow automatic updating” check box so there is a check mark in the box, the following dialog box displays asking if you want to turn on auto-update for all apps.

NOTE: You can view details about the permissions required for an app by touching “Permission details” at the bottom of the app’s page in the Google Play Store.

Google Play Store Version 5.0

   1.   To turn off automatic updates in version 5.0 of the Play Store, open the Play Store and touch the menu icon in the upper-left corner of the screen.

   2.   Scroll down and Touch “Settings” on the menu.

   3.   If your apps have been updating automatically, the “Auto-update apps” setting in the “General” section on the “Settings” screen will read “Auto-update apps at any time. Data charges may apply.” To change this setting, touch “Auto-update apps.”

   4.   The “Auto-update apps” dialog box displays. To prevent apps from automatically updating, touch the “Do not auto-update apps” option.

NOTE: If you want apps to update automatically, but you want to avoid going over your data limit, touch the “Auto-update apps over Wi-Fi only” option. That option allows your apps to automatically update only when you are connected to a Wi-Fi network so you don’t use any data to do so.

       In version 5.0 of the Google Play Store, you can still view permissions for an app by touching “Permission details” at the bottom of the app’s page.

 
      Manually updating apps allows you to review the permissions for each one, making sure they are ones you either agree with or can tolerate.

How to recover deleted files from hard drive

How to Recover Deleted From Hard Drive

       This is guide related to recover deleted fs’ session. The deletion can happen on your USB, SD Memory Card and Hard Drive. Since, the most important files being saved on Hard Drive of your PC. Therefore, today I am going to make you learn that, “How to Recover Deleted Files from Hard Drive?”

       We are going to use EaseUS Data Recovery Wizard professional Since, that software gives awesome results and you can easily recover deleted files from Hard Drive. You have deleted your Images, Software, Data, Files and Important Docs then don’t worry you can easily recover your all deleted files from Hard Drive with ease.

Learn-How to Recover Deleted Files From Hard Drive


       So, now without wasting much of your time, you are supposed to follow the below steps and then you will be able to recover your all deleted files from your Hard Drive. The software which we are going to use can be helpful to recover almost all kind of files from your Hard Drive. Now, without killing your time, you are requested to get towards the steps and recover deleted files from Hard Drive.

   1.   First of all Download EaseUS Data Recovery Wizard professional From this Link

http://www.easeus.com/datarecoverywizard/recover-deleted-files.htm


   2.   After downloading Install It and Ones Installation is done then simply Launch It
    3.   Ones it is launched then you will be able to see Types section which will be referring to the type of files which you want to recover. I would recommend you to Check mark all and Click on Next button

   4.   Then you will see Drives of your Hard Drive. Simply Select Drive from which you want to recover your deleted Files. If you want to scan your complete Hard Drive, then simply select all drives and Click on Scan button

   5.   Afterwards, it will scan your Hard Drive which will take some minutes and will show you the results of restoration

   6.   Ones the scan is done, you need to switch over Type Tab

   7.   Now Select Type or File which you want recover and then Click on Recover button

Then it will be easily recovered to its respective position
This was it!

Conclusion

       This was another guide about recovering deleted files which has made you learn that, “How to Recover Deleted Files from Hard Drive?” I am sure now you can easily recover deleted files from your Hard Drive. If you have any kind of questions to ask related to this tutorial then do let us know. We will get back to you as soon as possible.

       Additionally, if you have found this guide helpful and it has made you learn to recover deleted files from Hard Drive then do share it with your other friends too. Since, you may never know that your share may help any of your friend who is heading to recover deleted files.

Thursday, 20 November 2014

Top 5 action games for pc 2014

Top 5 Action Games For PC 2014

       There are many people in the world who are just crazy about givings, and most of them buy Computers just for playing awesome and fantastic games. Since, Gaming has become more popular due to its graphics and charms. Additionally, most of the gamers prefer Action Games.

       Since, the gamers receive a different kind of charm and thrill while Playing action Games. Therefore, for those gamers we are going to share a list of Top 5 Action Games for PC which you can play in 2014. These action games for PC has become more famous in this year 2014. Additionally, we are sure that you will love this list for sure.

Top 5 Action Games For PC [2014]
So, now without testing your patience, we are taking you to the list of top 5 Action Games for PC which you can play in 2014. The list is based on research and reviews of players on official sites. You are supposed to go through the list and choose that the game which suits you most.

1- Watch Dogs 2

       Watch Dogs is an Ubisoft Montreal game published by Ubisoft in the year of 2014. You can play watch dogs in PC, PlayStation 3, PlayStation 4, Xbox 360 and Xbox one. This is a great game competing with GTA V and though GTA V is not yet released for PC, you can play this game. Watch Dogs was released on 27th May 2014 and now it is available on all the platforms mentioned above.

       In this game you have to explore the map on foot or on a vehicle. You can play both ways Single player and multiplayer. It’s a third person Action-Adventure game. The storyline is too complicated and awesome, If i will explain here then you will not get joy while playing the game. I have played several games and had found this game to be awesome is the reason behind why i have shared this game on the first place.

Must  read top 5 Racing Games for Android

2- Tomb Raider 2013

       Tomb Raider is a game published by Square Enix in 2013. It is presented in third person perspective, you have to play the character “Lara Croft” . It’s an Action game having good graphics and game play. I personally recommend you to play this game.

At the starting of the game, you were on an island after the ship crashed, you have to escape the island Yamatai from where no one can escape. If you want to know more you should play the game and take the experience about how you can escape a place where you got stuck.

3- Crysis 3

       Crysis 3 is an First person shooting game, developed by Crytek and published by Electronic arts on major platforms like Playstation 3, PC and Xbox. It’s the third part of crysis series and was first time announced on April 14, 2012 and released on February 19, 2013 by Electronic arts.

       It has won the PC most valuable game award. It’s an futuristic game concentrated with new york city with great graphics. As we know we get the main game experience in multiplayer, so on PC 16 multiplayers are allowed and on consoles, 12 can play, that is a good number.

4- Assassin’s Creed Black Flag

       Assassin’s creed black flag is an historical based action game released in 2013 which was developed by Ubisoft montreal and published by Ubisoft. It is the sequel of Assassin’s creed 2014, which was released in 2012 followed by Assassin’s creed revelations. You have to play as Edward kenway in the game the father of Haythem the Grand master the grand father of Connor who both are associated to assassin’s creed 3.

       Basically you are living the memory of some other people’s, you are Desmond miles and living your ancestor’s life to find the apple of eden in brotherhood and achieve new things in other parts. Download or order the game today and play it.

5- Prototype 2

After the great success of prototype 1, Activision decided to develop and publish an sequel to this game named as prototype 2 which is a third person game and an action-adventure game. You can free roam over the cities only if you are not a geek

How to take Backup contacts and sms in android devices

How to take Backup contacts and sms in android devices :

       In our daily usage of mobile we may loose our Contacts or important SMS which is not really a good thing to be happen. So, we need to get back those lost details If you are using an Android Phone here we are delivering you the best methods to Backup your Android Phone Contacts and SMS in this post.

       The methods which we share here are Offline and Online methods, they have their own importance and I recommend these two. So read along these methods and if u face any problem in accessing these methods feel free to comment below.

Backup Your Android Contacts And SMS – Offline Method

       The Offline method is very simple and easy method, Many Android users don’t know about this method which is quite easier. In this we are making a copy of our Contacts or SMS on memory card which can also be deleted so I recommend you to save this back up on your Computer or Laptop.

How to Make a Backup of Android Contacts:

   1.   Open your Contacts.
   2.   In the Contacts Click on the Menu.
   3.   You will find a option like   “Export To SD” there.
   4.   If you are asked for permission To create a Vcard, Click YES.
   5.   Then a copy of contacts will be created on memory card.
   6.   I recommend you to save a copy of this on PC.

Backup Your Android Contacts And SMS – Online Method

       The Online method of backup Android Contacts and SMS can be done in two ways one is through by an available App in Play store or by Gmail.

1. How to Backup Android  SMS Using the App:

       Backup through an App is a quick and straight process, They are many Apps available in the Play store of Android but i recommend this SMS Backup & Restore. This is the best app and it is available for free of cost. This App helps you to store your Contacts and SMS in a directory. Follow the below steps

   1.   Download the App from Play store or from the below link.
   2.   After Installing the app
Open the App Click Backup button and it will be backup
   3.   Click on the restore for restoring and follow the process.

  Download  here

2. How to Backup Android Contacts Online

       Android OS was created by Google, it is a known fact and Google had made forced or compulsory to Android users to use an Google account with that device. This Google Account can be used to access all other Google Products Like Gmail, YouTube, G drive and many more and from this Gmail can use to Backup your contacts Online. Follow the below steps.

   1.   Open Settings option from your Menu.
   2.    You can find “Account And SYNC” or “Google Account” click on it.
And Click on “SYNC Contacts” once you found it.
   3.   After clicking on it your Contacts will be saved on Gmail Online.
   4.   You can access your Contacts from Gmail when ever you needed.
If you changed your device you can use this account and Sync your contacts to that respective device.

Nexus 6 technical review

Nexus 6 technical review :

      The new Nexus 6 was a great BIG surprise to everybody – in size and pricing – however, being made by Motorola this year, we were not surprised to see a bigger version of the Moto X, only this time around Google told them to put in the best specifications you can get your hands on.  Following the style of the Moto X, the Nexus 6 has the same small bezel front and the Moto X curve in its back, although there are no custom choices and what you see in Cloud White and Midnight Blue are what you get.  It is the usual solid Motorola built and even though it is a large device, it is comfortable to hold.

      We already talked about the 6-inch AMOLED QHD display that packs 493 pixels-per-inch (PPI) and the Qualcomm Snapdragon quad-core processor, 3GB of RAM and 32GB/64GB of internal memory.  We will jump down to one item that is different – the cameras.  The Google really upped their camera specs this time around by giving the Nexus 6 a 13MP main camera with auto-focus, a dual-tone LED flash ring that encircles the camera lens itself and they added Optical Image Stabilization (OIS)…and this compares quite favorably with the 16MP in the Galaxy Note Edge.  For the front-facing camera (FFC) they put in a 2MP to take your social media selfies and for video chatting…not quite up to the 3.7MP wide angle in the Note Edge, but the 2MP will certainly do the job.  The battery in the Nexus 6 is a huge 3220mAh size – the same used in the Galaxy Note 4 – because of the curved display, Samsung shaved the Note Edge to only 3000mAh.  We also need to ‘note’ that the Nexus 6 battery is not removable while the Galaxy Note Edge’s is removable.

      As far as extra features go, the Nexus 6 has a pair of stereo front-facing speakers, a water resistant nano coating, they included the Turbo Charger, and it is wireless charging capable.  Certainly one of the Nexus line’s most endearing qualities is it comes with the latest and greatest Android 5.0 Lollipop and will continue to get the updates quicker than anybody else…certainly faster than any Samsung.  It also packs some great Motorola software features as well.  It is also available on all the major U.S. networks for an off-contract price of $649 or a two-year contract price of about $199.

Top 5 Racing Games for Android 2014

Top 5 Racing Games for Android 2014

1. CSR Racing:

       CSR Racing has a huge collection of cars like the Audi R8, BMW M3 and Chevy Corvette. The game also boasts officially licensed cars from Bentley, Ford, GM, Mercedes, Mini, McLaren, Pagani and Nissan.

       What sets this game apart is the ability to totally customize your ride. Everything from unique license plates to aerodynamic tweaks to racing tires can be added to your car.

   The game was updated on March 6 2014.This update added the ability to rearrange your garage, turbocharge your season, and buy a bigger gas tank.

If you’re looking for a racing game that truly captures the look and feel of your favorite real-world cars, this is your best bet. This game currently has a 4.5 rating on Google Play and is published by NaturalMotion Games.

It is available in Google Play.

2. Need for Speed Most Wanted:

       Need for Speed Most Wanted is already very popular in android games. But it still tops in our list. Need for Speed Most Wanted makes our list because of its responsive controls and array of unique-looking cars. The realistic damage and head-to-head races with friends give this game a ton of replay value. Need for Speed Most Wanted is published by Electronic Arts.

It is available in Google Play.

3. Smash Bandits Racing 2014:

       Smash Bandits is a little Violent. Updated on March 17, Smash Bandits Racing 2014 now offers a new racing league, two new cars, and some seriously badass enemies in the form of police helicopters that have been equipped with missiles.If you’re tired of racing games where you just drive around in circles, the frenetic carnage of this racing game is likely to appeal to you. Smash Bandits Racing 2014 is published by Kinger Games Team.

It is available in Google Play.

This game is also available on Apple iStore.

4. Drag Racing:

       Drag racing is another best android racing game in our list. Drag Racing has over 50 cars you can try. You can participate in real-time races against 9 other drivers at once. While the graphics aren’t the most amazing we’ve seen in an Android game, the ability to race against so many other live opponents really makes this game a lot of fun.

Drag Racing currently has a rating of 4.5, and was published by Creative Mobile Games.

It is available in Google Play.

5. Groove Racer:

       Last but not the least, The groove Racer gets on our list for its amazing game features.

       This racing game will appeal to kids, as well as to fans of more casual games. This isn’t a racing game for auto fans or gear heads. The learning curve here is exceedingly gentle, which makes this a good game for playing while on your morning commute.This game boasts 66 free tracks (plus another 22 premium tracks) alongside 16 cars. The one-finger controls make Groove Racer a unique racing app.

       Groove Racer currently has a rating of 4.1 on the Google Play store, and was published by Outfit7. The gameplay trailer above shows the game on iOS, but still gives a good idea of what the Android experience is like.

It is available in Google Play.

Wednesday, 19 November 2014

How to use Qi wireless charging: Wirelessly charge your smartphone

How to use Qi wireless charging: Wirelessly charge your smartphone

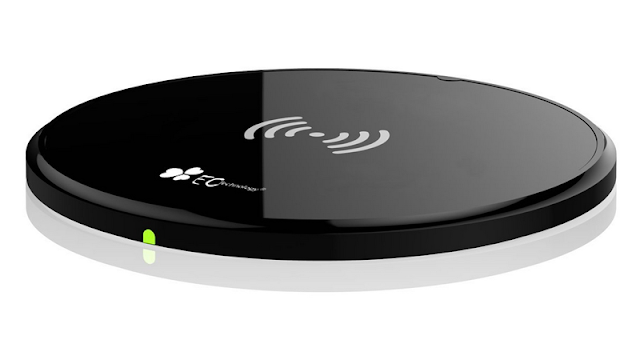
       Many of the latest smartphones and tablets come with support for Qi wireless charging, but what exactly is that, and how do you use it? Here we explain how to set up Qi wireless charging on the Nokia Lumia 735 using the EC Technology Ultra-Slim Wireless Charger.

What is Qi wireless charging?

       Qi wireless charging is a global standard to which many smartphones adhere. It allows you to wirelessly charge a compatible device's battery using induction transfer, simply by placing it on top of a wireless pad - and with no need for cables or adaptors (other than to the wireless charger itself). 

Where can I use Qi wireless charging?

       As we've seen with Wi-Fi hotspots, eventually Qi will become a common feature in hotels, airports, train stations and more, allowing you to top up your device wherever you go. You can also buy your own Qi wireless charger for home use, such as this EC Technology Ultra-Slim Wireless Charger, which costs just £12.99 from Amazon UK.

Can I use any Qi charger?

Yes. If a smartphone supports Qi wireless charging then any Qi wireless charger will be compatible with it - not just that which is sold as an official accessory for the phone. This means you can often save some money on a third-party brand charger, as is the case with EC Technology's Ultra-Slim Wireless Charger.

How powerful is Qi wireless charging?

       The low-power Qi wireless charging specification is able to deliver up to 5W of power; medium-power Qi will offer up to 120W.

       Low-power Qi is said to be able to travel up to 4cm. With the EC Technology Ultra-Slim Wireless Charger we found our Nokia Lumia 735 would still charge when held up to 2cm above the pad. Obviously this isn't comfortable or practical, but it's interesting to note the two devices don't need to be in direct contact with each other.

How long does it take to wirelessly charge my phone or tablet?

Wireless charging is typically slower than traditional charging. This EC Technology Qi charger delivers a 1A current. That's pretty standard, and fine for a smartphone, but you'll notice the difference with tablets such as the Nexus 7 - these will charge much faster using a 2A charger.

How to use Qi wireless charging

  Step 1.    Although your Qi-enabled smartphone or tablet no longer needs to be plugged into the mains, the EC Technology Ultra-Slim Wireless Charger does. It is supplied with a Micro-USB cable, which you can either use in conjunction with your now-outcast smartphone- or tablet charger, or you can plug it into a PC's USB port. Or a power bank, if you're wireless charging on the move. With power connected you'll see the EC Technology's LED light up green.

  Step 2.    Check your phone or tablet supports Qi wireless charging - this will be listed in the manufacturer's specification, and if you're able to take off the device's rear panel you'll be able to see the tech (as is the case with our Nokia Lumia 735). With devices that don't support Qi as standard you can often add the functionality - for example, Samsung sells a wireless charging kit for its Samsung S4 that replaces its original rear panel, but it costs £60.

  Step 3.    Simply place your device on top of the wireless charging pad. You'll feel it vibrate, the EC Tech's LED will flash blue, and the device will begin to charge. When it's finished charging simply remove it from the pad.

How to Block Ads on Android Apps and Browser without rooting

How to Block Ads on Android Apps and Browser

       The Android users always get annoyed from the extra and useless ads on Android apps and Browsers. They simply want to get rid of them. Therefore, today we are going to share a method to block ads.

       Some of the users might not be aware with the method of blocking ads on Android apps and browsers. Therefore, you can learn a complete method that, “how to block ads on Android apps and Browsers”.

       If I tell you my views on those extra ads, so, I would simply say you that it is really annoying. Every user want to work in free and friendly environment. Hence, to enjoy that friendly environment you are supposed to perform some sort of tricks.

       You can use this methods to block ads on Android apps and browsers. Ones, you have applied this trick then you will be able to use apps without ads and browse the internet without the interruption of extra ads.

Why to Block Ads on Android Apps and Browsers?

      First of all, let me elaborate it more for you. You are supposed to block ads in order to enjoy the clean and friendly environment.

      When you block ads for your apps and browsers then it makes your app work faster and increases the browsing speed of your internet, since, the interruption has removed from your Android.

Block Ads on Android Apps and Browsers

       So, friends here comes the main part of the post, which will make you understand that, “how to block ads on Android Apps and Browsers?” We are going to use two different methods for doing so.

       You can select any of your convenient method and can start blocking the ads for your apps and browsers. These both methods work awesome and fine.

Block Ads Using Adblock Plus for Android
       This is the best method which we have got for you guys to help you out in blocking the ads using Adblock Plus. In this method root is not required at all.

   1.   First of all, you need to enable unknown sources-you can disable it after ending the block ads process. To enable unknown sources you are supposed to go to Settings >> Security >> Applications.

   2.   After enabling the unknown sources, you are supposed to download Adblock Plus APK. After the completion of  downloading Install it.

   3.   After the installing, run Adblock Plus for your Android device and enable filtering. Then it will automatically done the proxy setting for your device.

   4.   However, if it does not do the automatic proxy setting for your devices then you can do it manually as well by referring this official guide

   5.   Ones you have done and followed all the steps then it will start doing its work and will start blocking useless and annoying ads on Android apps and browsers.

Note: Adblock Plus will keep on blocking ads until it is enabled, ones you have disabled it then it will not block ads for your device.

Saturday, 15 November 2014

Curved glass and stitched leather: ASUS ZenWatch powered by Android Wear

Curved glass and stitched leather: ASUS ZenWatch powered by Android Wear:

      Every new Android Wear device makes it easier to match your style, and today we’re introducing another great watch into the mix: the ASUS ZenWatch!

       For starters, the stitched leather strap and curved, stainless steel body make the ZenWatch both comfortable and attractive to wear. It also has a curved glass display, which provides a smooth surface for easy gestures, and a beautiful window for watch faces. Finally, the ZenWatch includes a unique set of sensors that help you keep track of your heart rate, step count, and even relaxation levels.

Titanium Backup Now Works On Devices Running Android Lollipop Following 6.2 Update

Titanium Backup Now Works On Devices Running Android Lollipop Following 6.2 Update:

       With the release of version 6.2, Titanium Backup should now play along nicely with Android 5.0. This means rooted users who have already jumped to Lollipop can continue to use the tool to back up, restore, or freeze whichever apps they wish.

       When you install the app, it's not going to look pretty. There's no Material Design to drool over, nor are there any fancy animations to catch your eye. Even the icon looks a little out of date these days. But this is Titanium Backup, and that's just part of its charm.

      The developer has also quashed some other bugs, so give the changelog a glance as you go to try out the app. Just keep in mind that 6.2 comes with "initial support," so while things should work just fine, there's always room for surprises.

What's new:

  • Added initial support for Android 5.0 Lollipop.
  • Fixed "force close" feature not working in some rare cases.
  • Fixed possible FC when syncing back from Google Drive (server-side bug).
  • Updated specific data exclusion for Google Play Newsstand (Magazines).
  • Updated translations.